Making use of your photographs
If, like me, you enjoy taking photographs, then why not use them in your blog posts. An easy way to do so is to open a Flickr account, upload your photos to it, and then use them when you need to.
Flickr is, to be honest, looking a bit long in the tooth, although its recent innovation of displaying very high resolution photographs by default is, shall we say, striking. But it is still a great service in my opinion, and for the writer a much better one than, say, Facebook.
Flickr is an online service for storing and displaying photos. The basic service, which gives you lots of storage space, is free, or you can purchase unlimited space for a relatively modest annual charge.
You can make photos public, or private. If private, you can make them visible only to yourself, or to family, or to family and friends.
You can organise your pictures into sets, tag them, join groups (for example, I belong to a group called ‘white and ginger cats’, which specialises in photos of, erm, white and ginger cats. Or you can create your own groups. You can also follow other Flickr users.
I like using Flickr because it means that not only do I have a convenient place in which to store my photos, but I can easily incorporate them into blog posts without having to ask anyone else’s permission.
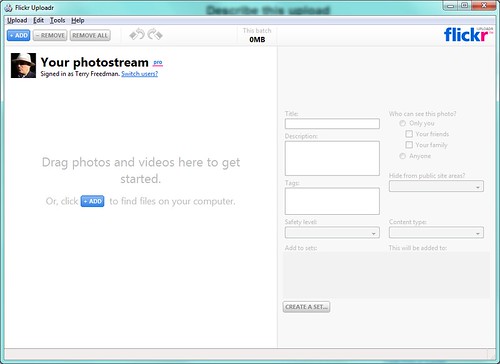 The free Flickr Uploadr application makes it easy to set tags and allocate pictures into sets, and for more than one photograph at a time
You can upload photos straight from Flickr itself, although I prefer to use a programme called Flickr Uploadr, which you can obtain, free of charge, from the Flickr Uploadr web page. As you can see from the screenshot, Flickr Uploadr enables you to tag your pictures and put them into sets (multiple sets at that!) and set the viewing permissions.
In Flickr itself, you can also set the default licence (go to your account settings, and click on the Privacy and Permissions tab). I have mine set to a Creative Commons licence that allows anyone to use my photos for private (ie non-commercial) purposes. But if I made a living from selling my photos then I would set the licence to ‘All rights reserved’. Note that you can change the licence settings for individual photographs.
Once your photos have been upladed, you can link to them, or even embed them in your blog posts by using the “Share” button shown in the screenshot below. (You can use other people’s pictures in the same way, but do make sure that the licence allows it. You can check by scrolling down past the photograph.)
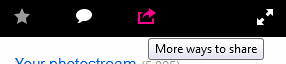 Clicking on the highlighted icon leads to the following box appearing...
 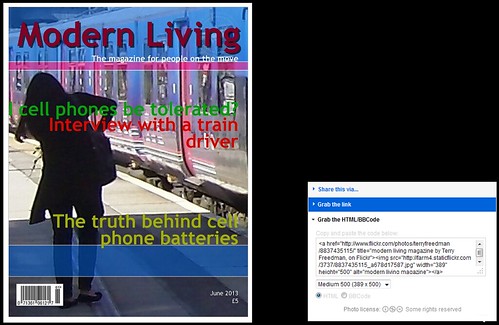 It is very easy to share a link to your photo or to embed it in your bllog psot or web page
You can use different sizes. I like to use a small one or thumbnail for the summary text, ie the portion of the article that appears on the front page of the blog, and a medium sized one for the main article. That’s what I’ve done here, as you can see.
To find out how to embed other kinds of media into your blog posts, see my article How to incorporate media into your blog or website.
Do you like the magazine cover shown in the main screenshot here? I’ll be explaining how to create your own very soon.
